CHRIS RAMSEY WOODTURNER/CARVER
Welcome | About | Plans and Instructions | Tips and Tricks | Turned and Carved Art
Hats | People | Articles and Videos | The History of the Wood Hat | Links | Contact
- Making a Full Size Hat Jam Chuck -
Start by gluing up several pieces of hardwood or MDF measuring 9 ” x 9 ” x ¾” or 1”. Match grain direction for best results if using hard wood. One solid piece of kiln dried hardwood is also acceptable.
The dimensions when glued up or solid block need to be 9 ” wide x 9” wide x 6” tall. The pieces can be cut into discs on a band saw into 9 ½” dimensions before gluing to save a little time when chucked on to the lathe.
After glue has cured, locate center of blank by marking from corner to corner forming an X on each end of blank. Using a faceplate on the headstock, bring up tailstock in the center of the X on the tail stock end which will center the blank. Use extreme pressure to jam chuck the piece against the faceplate. The 9 ” x 9 ” surface against the faceplate will provide a perfectly flat surface that is safe to turn when the tailstock is applied with great pressure. This will give you a flat plain to begin roughing the blank. If you are not comfortable with jam chucking against the faceplate, this can be turned between centers.
Round the blank and turn a mortise on the tailstock side that can be held by a stronghold chuck. Remove from lathe, remove faceplate and install stronghold chuck. Mount the blank on the stronghold chuck gripping the blank in the mortise. Bring up the tailstock for safety and support.
Next, perfectly flatten the tailstock side and turn a mortise on the tailstock side that will be used by the stronghold chuck to hold the blank as pictured.
After turning the mortise, put the blank back on the lathe using the stronghold chuck in the mortise.
Round the blank and flatten the tailstock side.
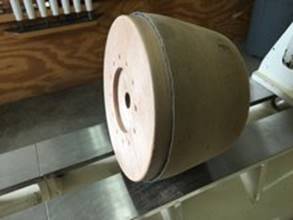
The jam chucks finished diameter will be evenly tapered from 8 1/2” OD (outside diameter) at the headstock side to 6 ¾” at the tailstock side. I used a straight edge ruler to make sure that my taper was even from 8 1/2” at the headstock side to 6 ¾” at the tailstock side.
Hollow the jam chuck to a 1” wall thickness leaving the jam chuck 1 ½” thick on the bottom side. Flatten the hollowed bottom inside of the jam chuck.
Sand the outside of the jam chuck to 220.
Use ¼” thick neoprene (wetsuit material) that will be applied to the outside of the jam chuck. The neoprene should have one side that is rubber and the other side is material.
Neoprene can be purchased from material suppliers or dive/surf shops. I found an over-sized place mat at Hobby Lobby that was made of neoprene and cost $5.20 and used it.
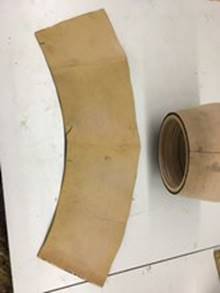
You can transfer the width, size and shape of the jam chuck onto the neoprene and get a correct size and radius by placing the jam chuck on its side on a large piece of neoprene and mark the side widths of the jam chuck onto the neoprene as you slowly roll the jam chuck 360 degrees. Your drawing on the neoprene will need to be three inched longer on the end than necessary to get a good fit when glued onto the jam chuck. The drawing on the neoprene will be shaped in a radius (like the shape of a rainbow as pictured).
Using the cut neoprene there will be a few extra inches of extra neoprene that will overlap when put on the jam chuck. Do not remove the extra material at this point. This can be cut to a perfect fit by the following steps:
Before applying spray adhesive, dry fit the neoprene to the jam chuck. The neoprene should start flush with the hollowed out end of the jam chuck. Tape the leading end to the jam chuck and rotate the chuck while wrapping the neoprene.
If and when you are satisfied with the fit use a pencil to make a mark on the jam chuck on the starting edge. This will give you an exact reference point with perfect alignment to begin applying the neoprene when sprayed with adhesive and ready to install.
Mount the jam chuck on the Stronghold chuck and apply the spray adhesive per the instructions on the spray adhesive can. To get an even coat of spray adhesive, turn on the lathe at the slowest speed and apply the spray adhesive. (Cover the lathe bed with an old towel or sheet to minimize the mess.)
Place the neoprene on a newspaper and apply spray adhesive to the rubber side ONLY of the neoprene.
Allow the adhesive to become “tacky” on both the jam chuck and the neoprene. This usually takes about 5 minutes.
With the leading edge of neoprene, line up the edge with the pencil mark you made on the chuck and apply the neoprene starting edge. Rotate chuck slowly by hand while applying the neoprene. Keep neoprene even and tight so there will be no wrinkles when applied to the chuck.
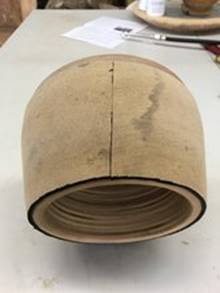
After rotating the chuck 360 degrees you will have 3 or 4 inches of extra neoprene on the end. Overlap the neoprene evenly and get a very sharp razor blade. With the neoprene overlapped evenly, use a straight edge to get a straight cut with the razor blade on the overlapped neoprene ends. Make sure to cut all the way through both layers of neoprene in one cutting motion. This will give you an exact matched cut for the two ends of neoprene to be butted together.
Next you will remove the extra neoprene that you have cut with the razor blade and butt the ends together for a perfect fit as pictured.
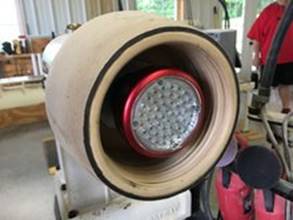
Purchase a solid metal electrical outlet cover at Lowe’s or any electrical supply store. Screw and glue the metal cover in the center of the inside bottom of the jam chuck as pictured.
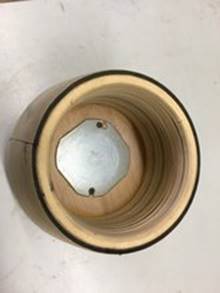
Purchase a 3 3/4” diameter LED battery powered puck light that has a magnetic base (pictured). My light is made by Ullman and is a model RT-48LT. I bought mine online. Install the LED puck light onto the metal plate inside the jam chuck as pictured. The magnetic base will hold well if centered properly as pictured.

Now your jam chuck is complete and ready to use.