CHRIS RAMSEY WOODTURNER/CARVER
Welcome | About | Plans and Instructions | Tips and Tricks | Turned and Carved Art
Hats | People | Articles and Videos | The History of the Wood Hat | Links | Contact
- The Three-Leg Natural Edge Bowl -

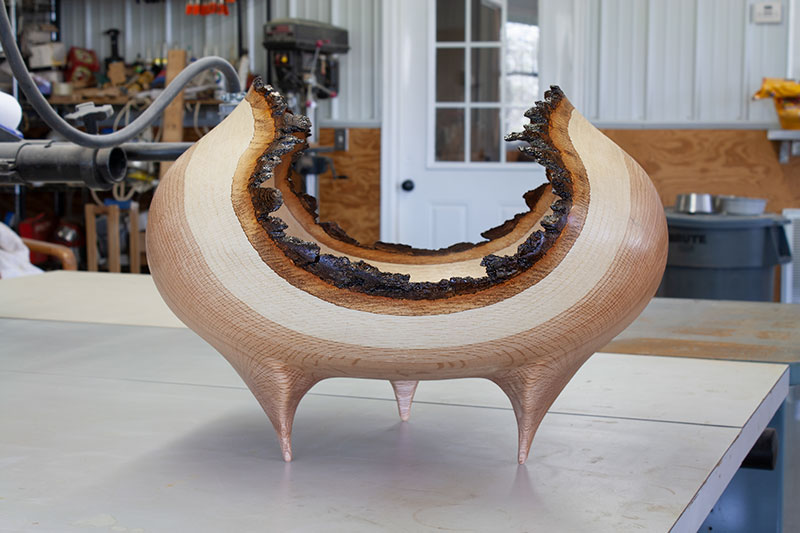
Turned and carved three-legged bowls and vessels can be challenging and are a lot of fun to make. The shape and design of a turned and carved piece can be changed on the fly and any changes in size, shape, or design are welcomed. You allow yourself the opportunity to explore unlimited shapes, designs, leg styles, rim design, natural edge, manufactured rim, closed form, open form, big and tall or short and squatty forms. For this document, my example is a closed form natural edge three-leg bowl.
The majority of the turning on this project is done using a ½” bowl gouge. I do use a ¼” detail gouge, a power sander, 80, 120, 180, and 220 grits sandpaper, and CA glue. The carving disks used are the Holy Galahad 4 inch disks made by King Arthur Tools that mount to a 4 ½” grinder. King Arthur makes four different grit disks in two different profiles, however, you will only need item #47871, a flat coarse blue disk. I occasionally use a rotary tool like a Mastercarver or Fordom rotary carver and some carving burrs for finer detailed carving.
Select a fresh cut or “green” piece of wood for this project. A fresh cut piece of wood will be a much easier turn and you will not have to deal with dry or cracked wood. Another advantage to turning green timber is the movement in the turned piece as it dries and the bending possibilities that can be explored with fresh turned timber. This piece will be turned in a side grain orientation. This piece will be turned from a large, fresh cut piece of black oak. I have selected a 20 inch section of an oak log that is 20 inches in diameter for this project.
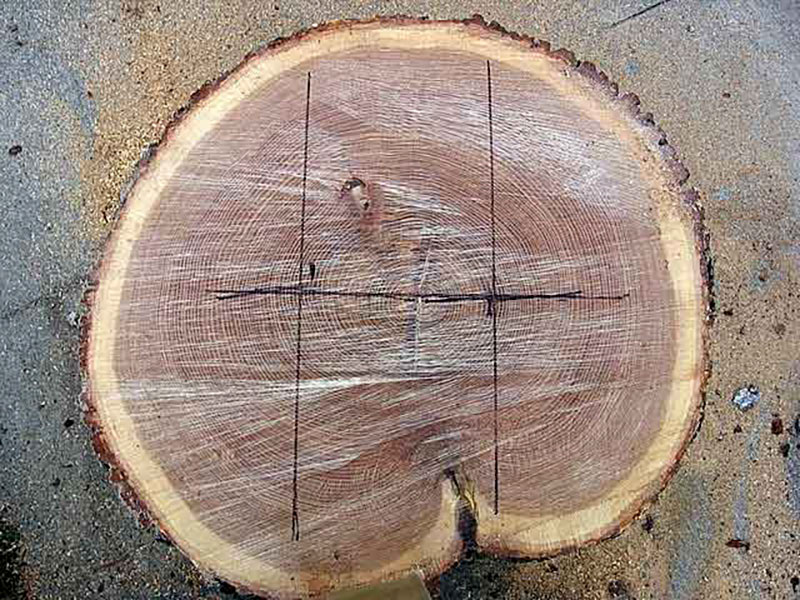
Take a look at the center of the log and notice the direction of the split or crack in the center or pith of the log. Stay a minimum of 1” to the outside of the center or pith of the tree and, using a straight edge, draw a line from bark edge to bark edge following the direction of the split as pictured above. (Do the same thing on the other side of the split and you will have two bowl blanks.) For this project, I cut the blank four inches on the right side of the pith leaving a larger section that included the pith so that I could make a piece with longer legs. Although the split is evident, the layout of the legs and the design of the bowl will eliminate the pith and all associated complications when utilizing the pith or center of the log. In most cases, if you cut too close to the pith make sure you turn away enough materials to get away from the pith or the bowl may crack during the drying process. Draw a line from bark edge to bark edge on both ends of the blank using the same depth measurement. It may be helpful to draw a line from the center of the pith toward the outside of the tree to line up the growth rings once the log has been cut in half as in Figure 1. This will help to make the bowl appear very well balanced.
After the log has been cut in two, transfer the mark from the pith of the tree on the end grain ends to the side grain ends on the flat cut surface. Draw a line connecting the two marks that were transferred to the flat surface of the blank as pictured below.
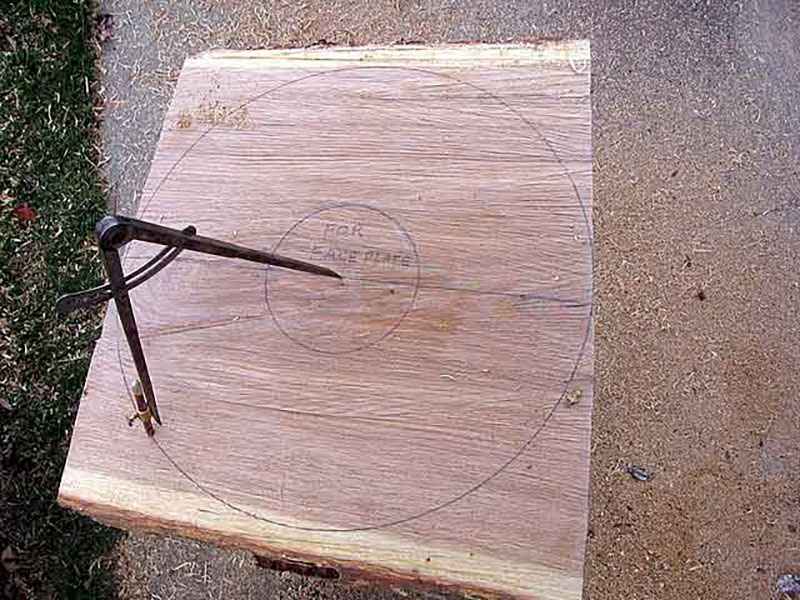
Using a compass put the point of the compass in the center of the line and draw a circle for the diameter of the bowl as in Figure 2. Using a chainsaw remove the corners and excess of the wood outside the circle to round the blank. Once the blank has been rounded with the chainsaw you can proceed to mount the blank on the lathe and balance the natural edge surfaces.
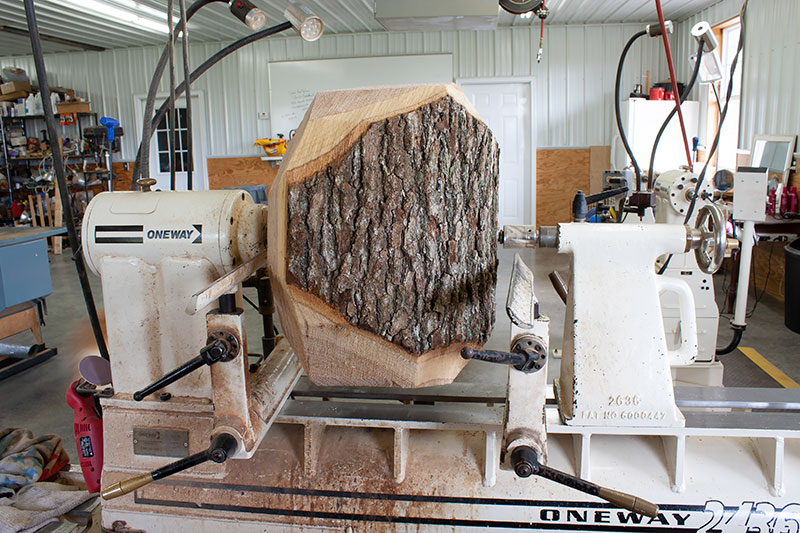
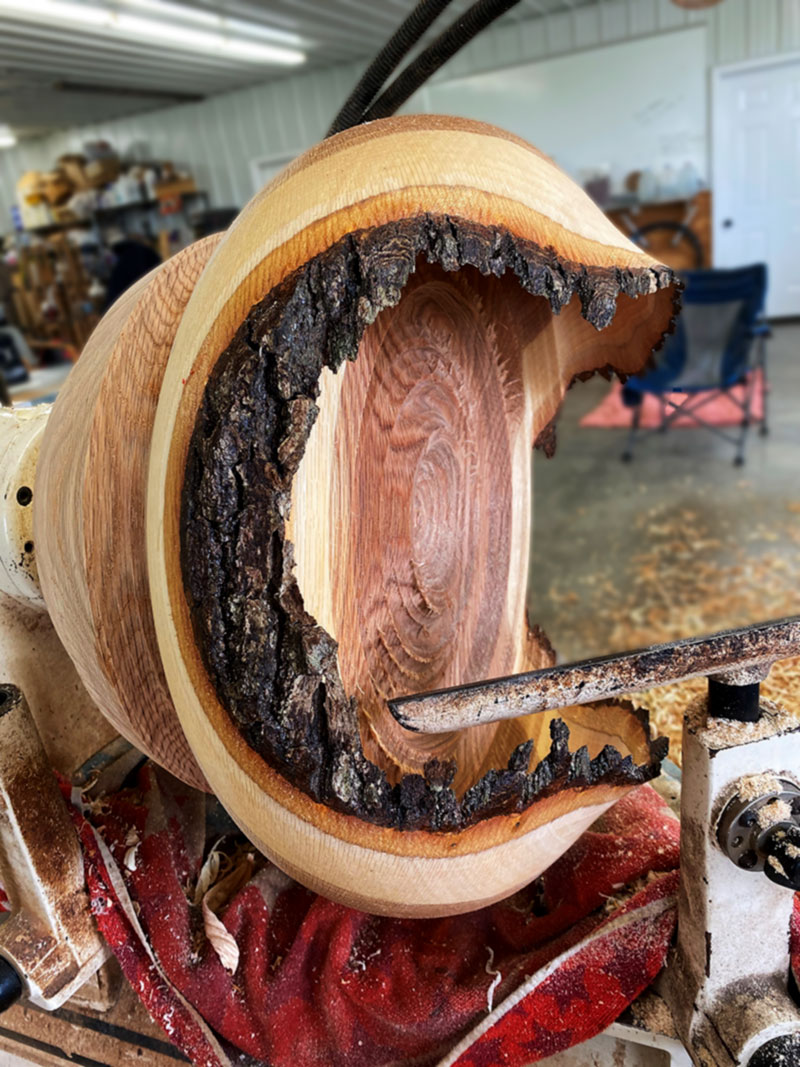
Mount the blank on the lathe between centers using a two-prong spur drive in the direction of the grain. If you are turning straight grain timber keep the spur drive on the previously drawn line on the center of the growth rings as in Figure 2. As long as the spur remains on the line you will end up with an elliptical shape in the center of the bottom of the bowl. Moving the spur off of the line will move the elliptical shape to the side of the bottom of the bowl which is much less pleasing to the eyes and less desirable to collectors.
Now you will balance the high points of the natural edge rim. Keep the spur in the center of the blank and on the line and reposition the bark surface at the tailstock side so that the two high points (end grain only) are on the same level when it is rotated. I use the tool rest and measure from the tool rest to the bark surface on the two high points then adjust as needed. Once the two high points are on the same level you will balance the two low points (side grain only) and balance the bark edge as close to the same level as possible when rotated. Before turning you will need to stabilize the bark surface with CA glue in the area where you plan to have the natural edge rim. Now you are ready to turn the outside shape.
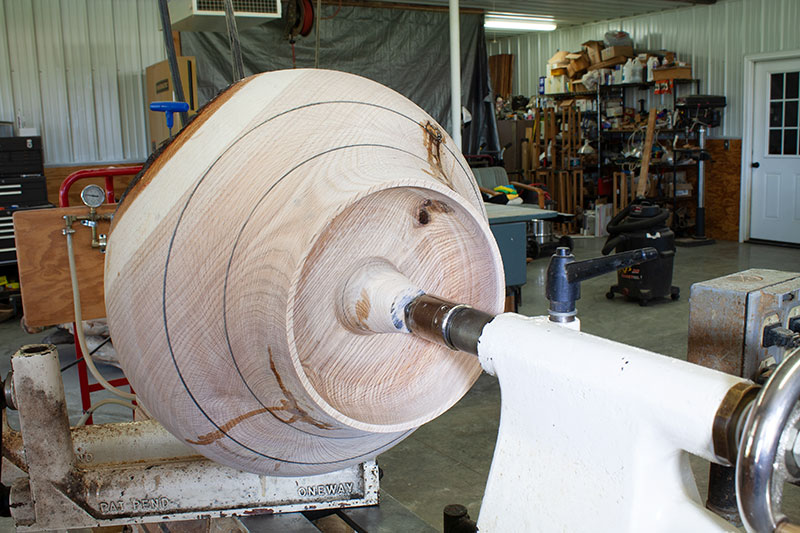
Rough the blank until it is round. Turn the bottom of the blank flat to accommodate a faceplate. I used a 6 inch faceplate and drew a 6 inch circle on the base while the blank was spinning to help align the faceplate. Remove the blank from the lathe, cut off the nub where the spur was, and secure the faceplate to the blank using all of the screw holes and heavy screws. I use stainless steel sheet metal screws that are nearly the same diameter as the faceplate screw holes and art extremely durable with a high shear strength. I used a center finder to make an indentation inside the center hole of the faceplate on the blank to realign the bowl after the faceplate is removed after the turning and hollowing have been completed. Mount the blank back on the lathe without the use of the tailstock and round the blank so there is no wobble and the blank runs true. Turn away the hole that the live center originally made when roughing the blank. Doing so eliminates the live center from finding the original hole that can cause the blank to run off center when the tailstock is brought up for support. After the original hole has been turned away, bring up the tailstock for support. Now you can increase the speed and establish the outside shape of the piece.

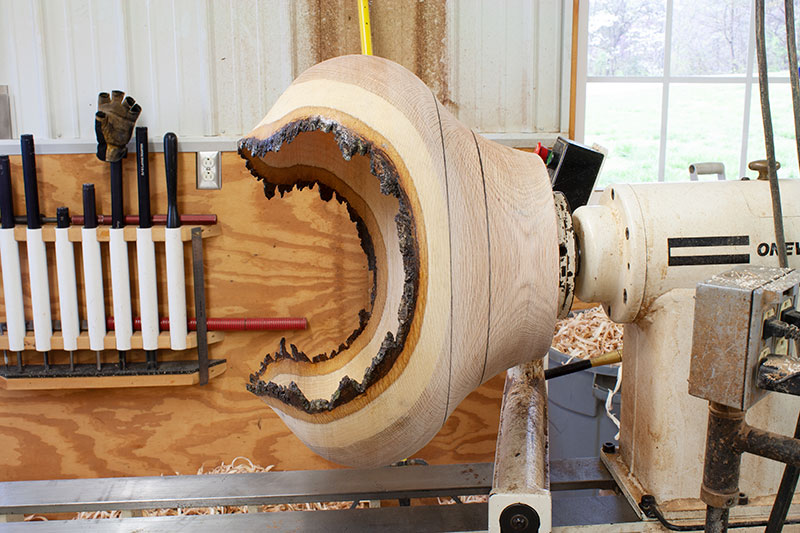
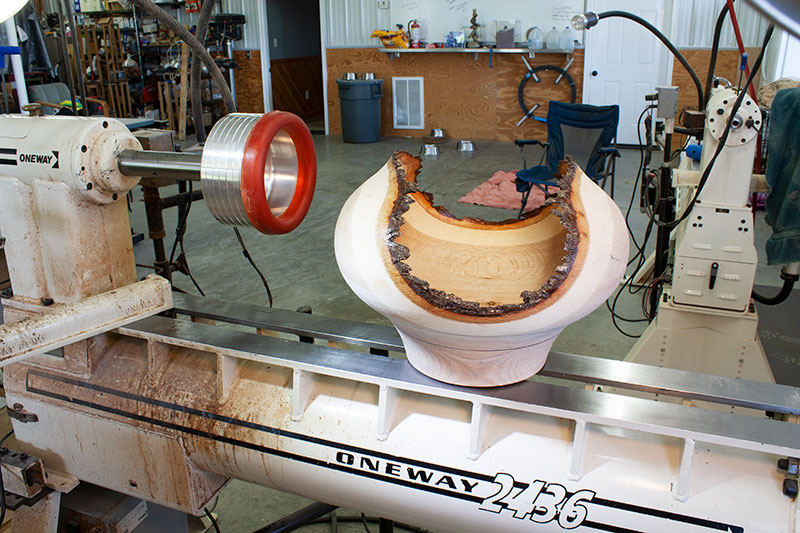
After turning the outside shape, use CA glue on the outside bark edge of the natural edge to stabilize the outside of the bark rim. On this piece, the rim was closed inward for a beautiful yet challenging closed form bowl. I incorporated the leg design into the continuous flowing form of the bowl to the bottom of the legs. Now that the outside shape has been established and the bark top and outside surface have been stabilized with CA glue, the hollowing can begin.
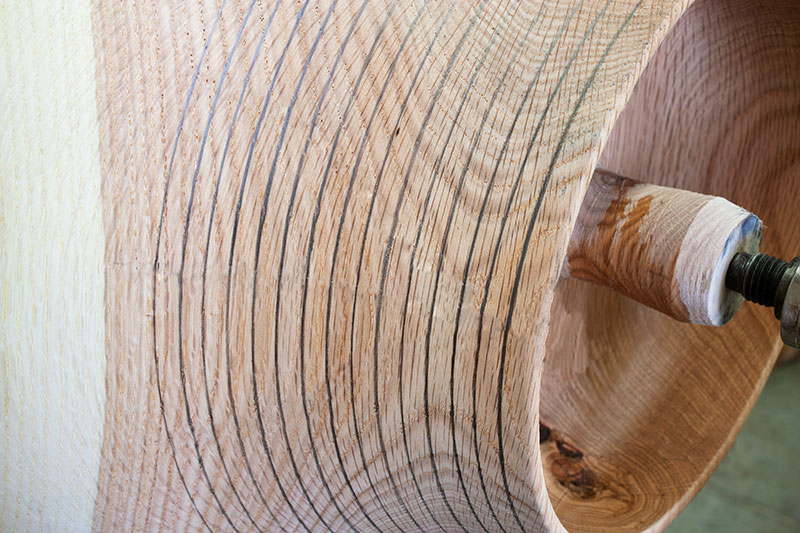
Hollow out the inside of the bowl working from the bark edge rim down the sidewall toward the bottom of the bowl. Be sure to keep the flute of the bowl gouge facing the three o’clock position and only make push cuts until you have turned below the bark edge. A pull cut can accidentally knock the bark off of the piece even after it has been glued. After hollowing down to below the bark on the inside, stop the lathe and glue the inside of the bark edge of the bowl. Now that the top, outside, and inside of the bark edge have been stabilized with CA glue the rest of the hollowing can continue.
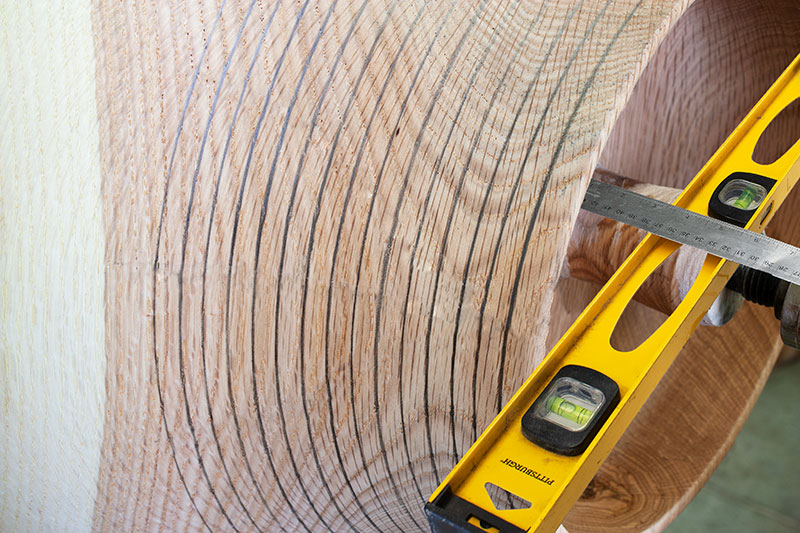
Continue hollowing the bowl to the location where you would like the top of the legs to begin on the side of the bowl. You can use calipers to establish a ¼” wall thickness to this point. I draw a line on the exterior of the bowl to mark the location of the top of the legs and another line where the bottom of the bowl will be as pictured above. The bottom of the bowl line is an “educated guess” as the mind’s eye follows the curvature of the side of the bowl to the estimated bottom of the bowl’s location.
After establishing the bottom of the bowl location, continue to hollow down to the bottom of the bowl. Calipers cannot be used from this point on because the side wall begins to thicken gradually as the leg design begins to turn outward and the bottom of the bowl continues inward to the bottom of the bowl. Turn a smooth, transition-free flowing shape from where the legs start on the side wall of the bowl down to the bottom of the bowl. From this point, the walls will gradually become thicker than the rest of the bowl for the carving of the legs. Remove material down to the bottom of the inside of the bowl so that the legs can be carved. Make sure to give your bowl a smooth, rounded inside wall and bottom of the bowl. Flat bottom bowls are not pleasing to the eye. After hollowing, power-sand the inside of the bowl using 120, 180, and 220 grits. The exterior of the bowl will be sanded at a later stage in the process. Brush on a coat of lacquer mixed with lacquer thinner 50%-50% on the inside of the bowl to keep the bowl from cracking. Allow the lacquer to dry for two to three minutes.
Remove the bowl from the headstock and remove the faceplate.
Place the bowl on the bedways of the lathe facing up as it will sit when it has been completed as pictured above.
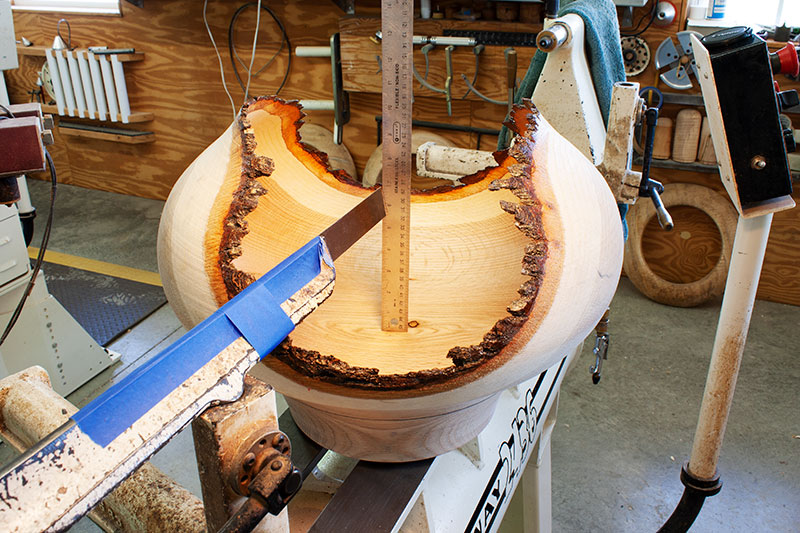
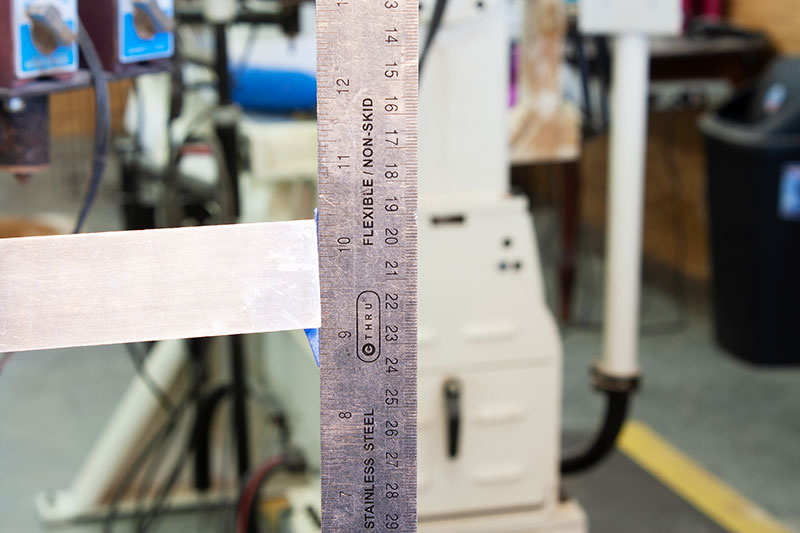
Now we will determine the amount of wood to remove from the underside bottom of the bowl on the inside of the legs. We will leave the bottom of the conjoined bowl’s thickness at ¼ inch. Due to the large size of the bowl, I taped a ruler to my tool rest to extend the length for a reference point. Set the tool rest directly over one of the bedways and lock it in place. Do not move the tool rest until all measurements have been recorded. Set the bowl on the bedways with the center of the bowl directly below the top corner of the ruler as pictured above. The top corner of the ruler will be the established reference point. Measure from the top corner of the ruler to the bottom of the center of the bowl as pictured above and record this measurement. For this bowl, the measurement was 6 ¾ inches. Slide the bowl away from the end of the tool rest/ruler and measure the distance from the reference point on the top corner of the ruler down to the bed of the lathe as pictured below and record this measurement. This distance was 10 5/16 inches. To determine the overall distance, subtract 6 ¾ inches from 10 5/16 inches which will give you a measurement of 3 9/16 inches. I want the bottom of the conjoined bowl’s wall thickness to be ¼ inch so I will subtract ¼ inch from 3 9/16 inches which is 3 5/16 inch. The amount of wood to remove from the bottom side in between the legs to the bottom of the underside of the bowl is 3 5/16 inches.
NOTE:
Think of the process of turning a legged bowl as turning one bowl just as you normally would but leaving a few inches of excess wood at the base of the bowl. Turn the hollowed bowl around and jam chuck the bowl using the tailstock for support. After jam chucking the bowl, turn another bowl on the underside of the first bowl inside the legs leaving a much thicker wall thickness and ¼ inch of separation between the conjoined turned bowls.
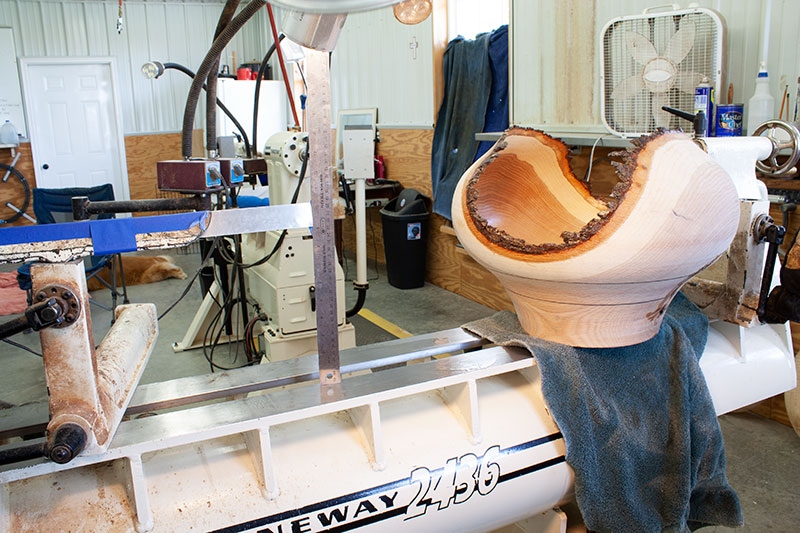
I installed a vacuum pump, a 10 inch spindle extension, and an 8 inch drum chuck on the lathe as pictured above. The spindle extension was necessary due to the size of the bowl and the depth from the bottom inside of the bowl to the top of the rim. The bowl was jam chucked to begin the hollowing in between the legs of the underside and the tailstock was used for support as pictured below.
The leg thickness started at ½ inch thick at the bottom of the leg. The thickness of the leg gradually increases as the leg continues upward to the bottom and side of the bowl. I remove wood carefully up the legs to the bottom of the bowl until the measurement is 3 5/16 inch from the bottom of the legs to the bottom of the center of the bowl. I placed a straight edge across the rim of the lower bowl and measured from the straight edge to the center of the bowl and removed material until the measurement was 3 5/16 inch as in the picture below.
After hollowing the underside of the bottom of the bowl, sand the entire exterior of the bowl and the legs inside and outside of the underside of the bowl. Do not remove the “bung.” Leave it for tailstock support while carving. After sanding to 220 grit, brush on a coat of lacquer and thinner mixed 50%-50% to prevent cracking.
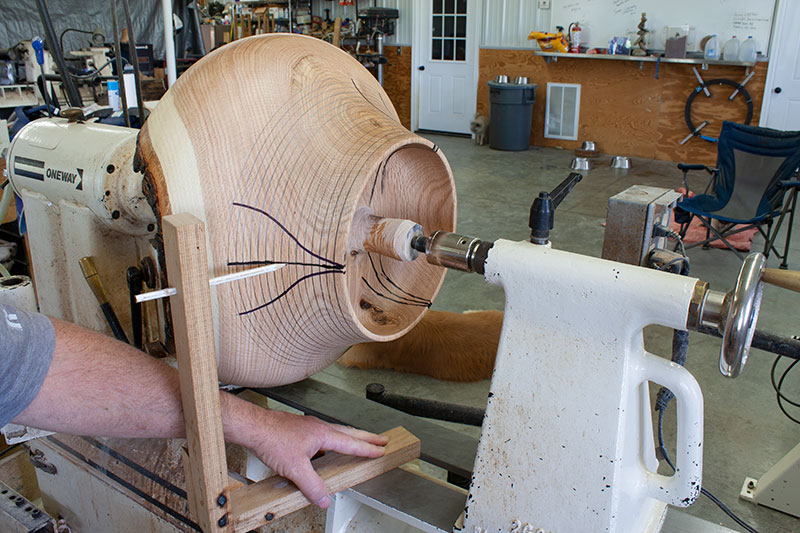
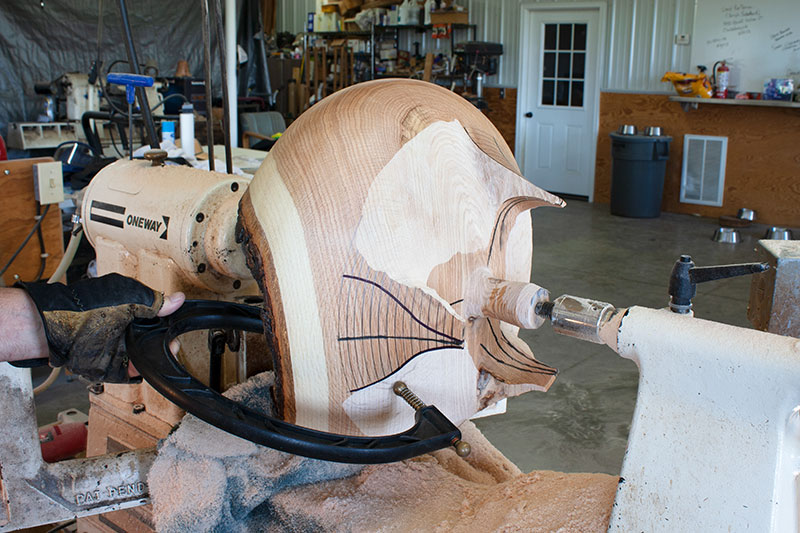
Now we will determine the front of the bowl, the three equal leg locations, and the design of the legs. Choose an area that you would like to be the front of the bowl and make a mark on the bowl. At the top of the leg where the carving will start, lay out several radial lines all the way around the bowl that are spaced either ¼” (or ½” apart on larger bowls) down to the bottom of the leg as pictured below.
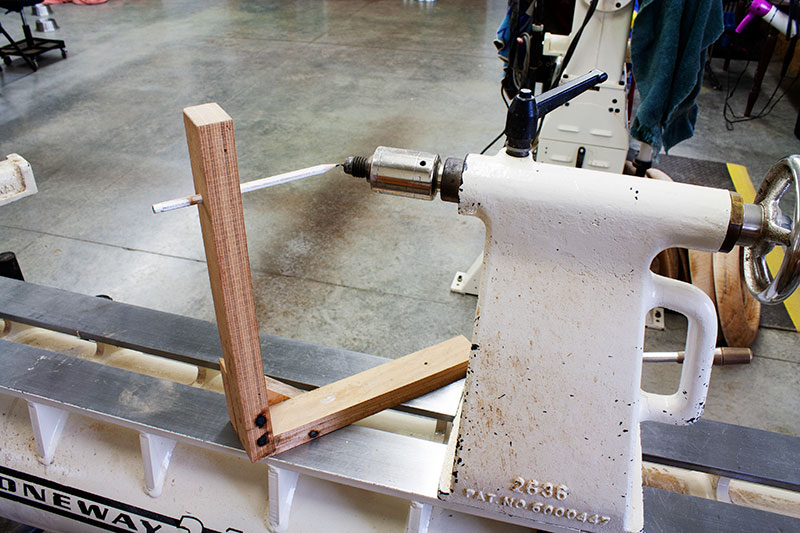
I made a right-angle centerline locator (pictured above) with a hole that will hold a pencil exactly at the lathe’s spindle height (in this case it is 12 inches) so that lateral lines can be made on a bowl directly on the centerline as pictured below.
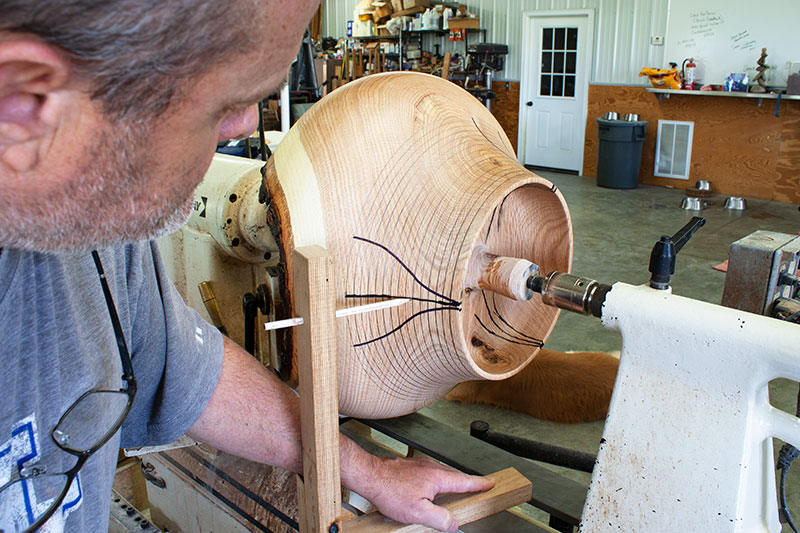
Locate the mark for the front of the bowl and rotate the mark to the point of the pencil as pictured above while keeping the centerline locator flat on the bed of the lathe. Leave the mark for the front of the bowl on the center line of the bowl and lock the spindle in place so the bowl will not rotate. Take the center line locater to the backside of the lathe and make a lateral line from the upper radial line all the way to the bottom of the bowl. Continue the line on the underside of the bowl to the center where the bung is. This will be the centerline for leg #1.
My lathe has a 48 position indexing wheel. 48 divided by 3 equals 16 increments. So the spacing of the three legs will be 16 increments apart.
NOTE: However many increments your indexing wheel has should be divided by three. This number will be the correct number of equal increments for your leg spacing.
Unlock the spindle and rotate the bowl the correct number of increments for your lathe. Draw a lateral line from the upper radial line to the bottom of the bowl and this will be the centerline for leg #2. Rotate the bowl the correct number of increments and draw a lateral line which will be the centerline for leg #3. Now you have three equally spaced leg center lines for reference points. This will make the layout of the legs very easy and exact to duplicate.
If you do not have an indexing wheel, take a piece of tape and, starting where the front of the bowl mark is, wrap the tape around the apex of the bowl. Where the ends of the tape meet, make a pencil mark on the tape. Remove the tape from the bowl and tape it down to a table or any flat surface. Measure the length of the tape and divide this number by three. Make a mark at the 3 equal division numbers (the first mark will be the end of the tape) then put the tape back on the bowl in the same apex location starting with the end of the tape 180 degrees from the mark of the front of the bowl location but on the back of the bowl so that the leg location is correct at the back of the bow. Wrap it around the apex and join the ends then transfer the three equal marks onto the bowl. This will give you three equally spaced leg locations. Now you can scribe the three leg centers using the centerline locator.
Be sure to draw the lines on the back side of the legs as pictured below. This will help keep the carving exactly the same on the back of the legs.
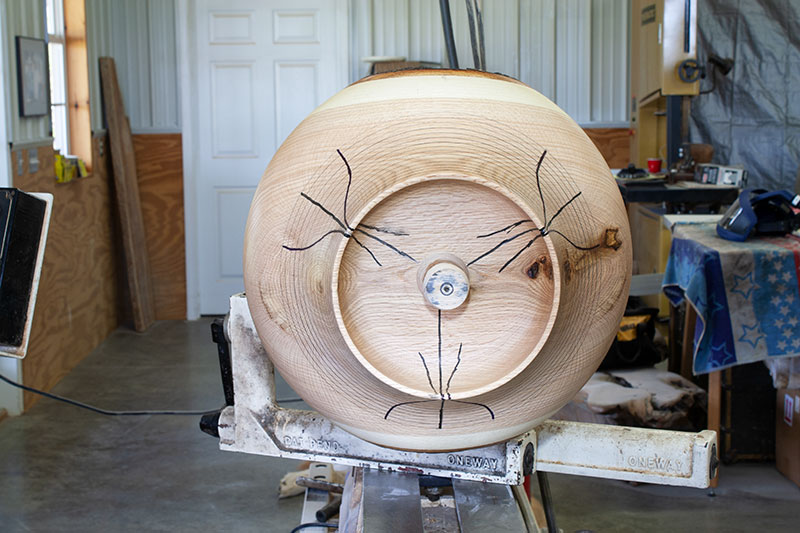
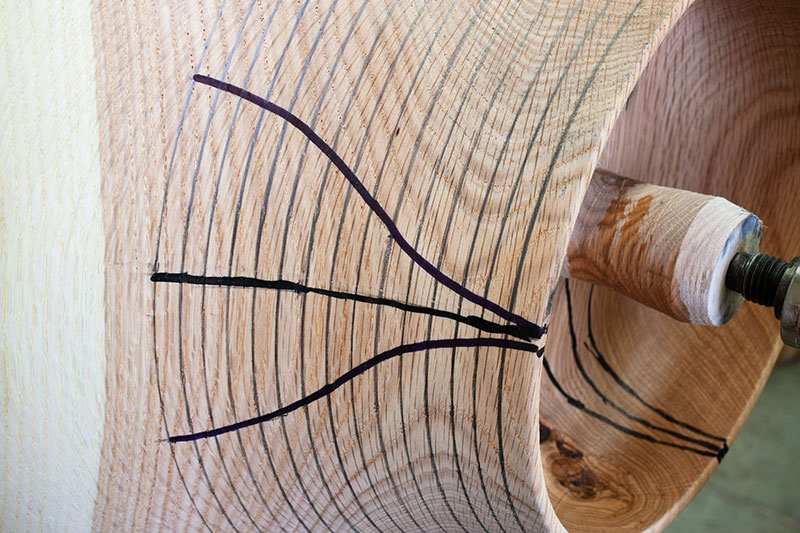
Draw one side of your leg profile design on the outside of the bowl in the radial lines. Once you like your leg profile design it is easily duplicated to the other side by using dividers. Set one point of the divider on the middle line of the leg and the other point on the outside of the leg profile that was previously drawn then pivot the divider to the other side and make a mark. Keep the divider set the same and rotate the bowl to leg #2 and repeat the process. Do the same with leg #3. Drop down one radial line and repeat the process. Continue until all of the measurements have been duplicated and transferred to the legs then use a black marker to connect the dots and outline the leg profile as pictured below.
Carefully carve away the material and stay outside the lines on both the outside of the legs and the back side of the legs. I start by carving away the material on the tip of the legs then carve toward the top radial line. Carve straight inward on each leg so that each of the legs will be carved and appear the same.
Lock the spindle of the lathe so that the bowl cannot rotate as you carve and take your time carving. Carve a little and check the backside of the leg often. I find it much easier to stand on the front side of the lathe to carve the left side of the leg. I stand at the backside of the lathe to carve the right side of the leg.
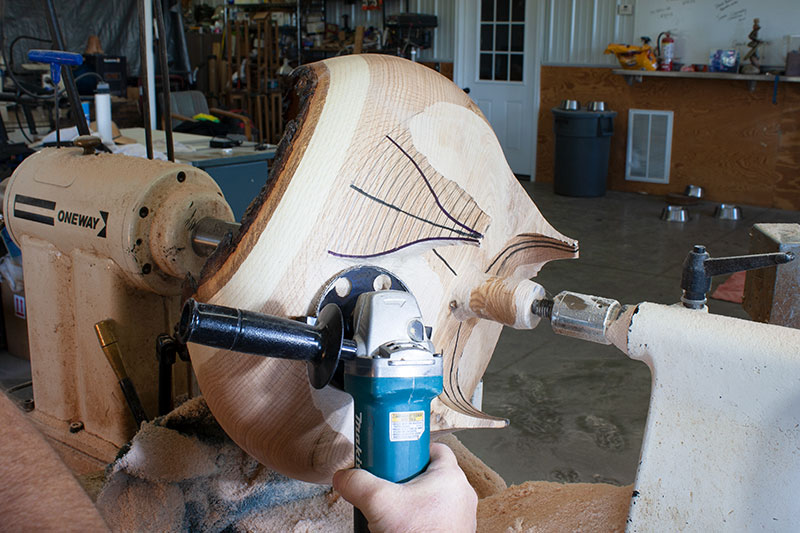
Pictured above is the Holy Galahad carving disk made by King Arthur Tools. Be sure to keep both hands on the grinder at all times while carving. In the above picture, the grinder was turned off and I held it with one hand and took a picture with the other hand. Never remove the handle from the grinder and never remove the safety guard for any reason. Always wear proper safety gear including hands, face, ears, eyes, and respiratory protection.
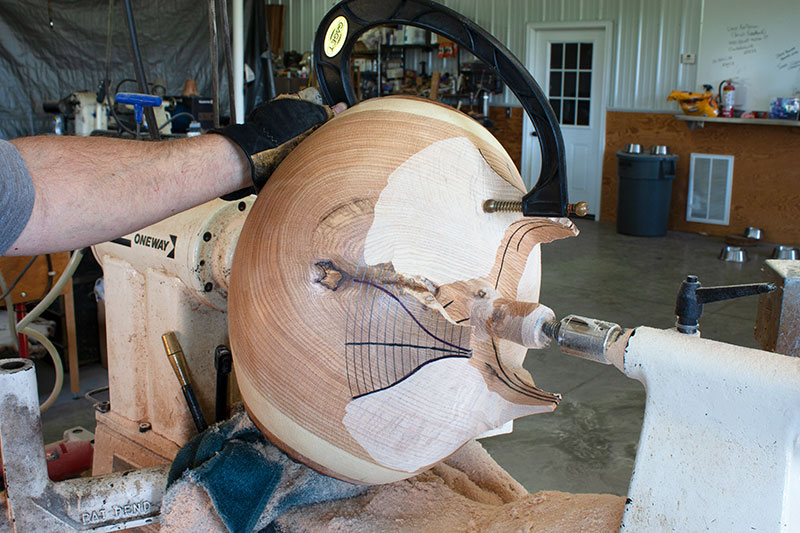
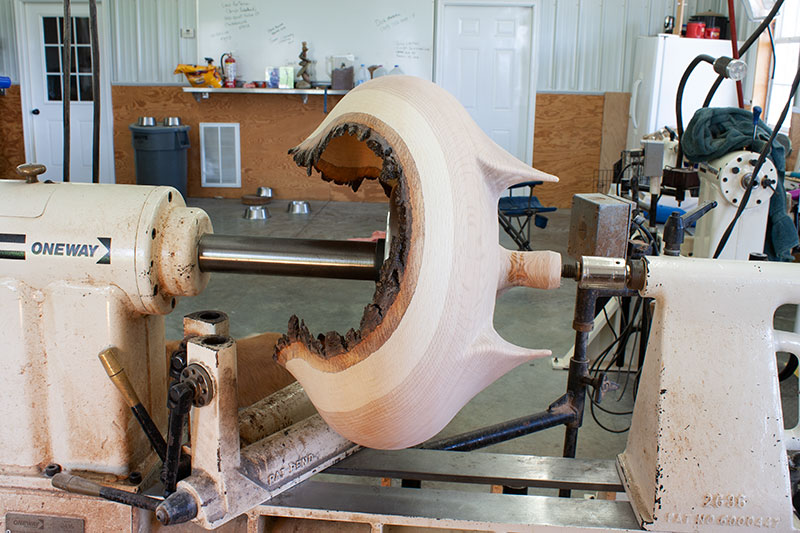
When carving the legs, make sure to carve straight inward (as pictured above) and not at an angle. Once material has been carved away from the side of the bowl, calipers can once again be used to gauge wall thickness as pictured below.
Continue to carve away the material between the legs and caliper the wall thickness often to verify how much material needs to be removed. Keep in mind that this is a subtractive process. Once material has been removed it cannot be put back on, so take your time and caliper often.
As material is carved away the leg profile and design begin to emerge as the carving continues and the thickness of the leg design becomes visible. I have found that it is much easier to turn the thickness of the legs, however, it is possible to carve the leg thickness. Carving the backside of the legs can be difficult so my recommendation is to turn the leg thickness from the underside of the bowl.
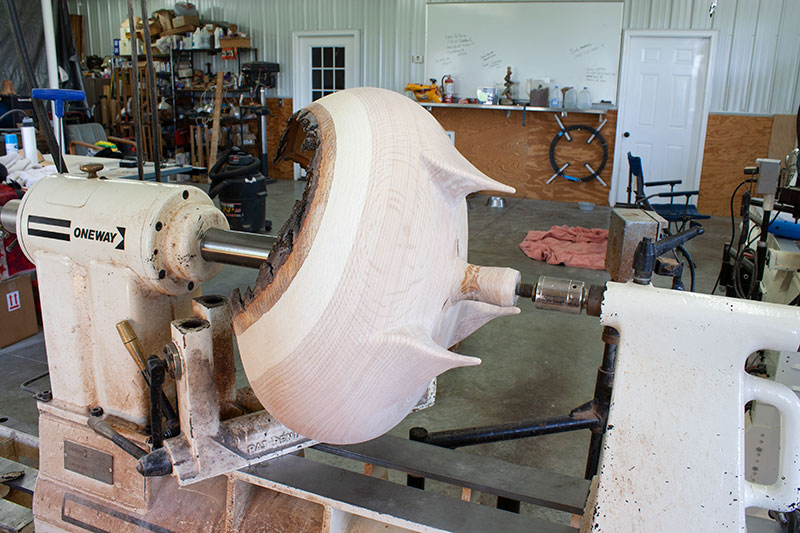
Once the carving has been completed, the legs can be sanded. I lock the spindle and start with 3 inch 80 grit disks and power sand the legs and bottom of the bowl. Do not sand the lines that were drawn on the legs until everything else has been sanded. This will help keep the leg profiles exactly the same. Once everything has been sanded, the radial lines on the legs and the leg profile lines can be sanded. The sharp corners of the legs can be softened and slightly rounded for a nicer appearance. When all carving marks have been removed, I use 120 grit, 180 grit, and 220 grit disks to complete the power sanding. I hand sand the corners and the tips of the legs removing all imperfections and sanding marks as pictured below.
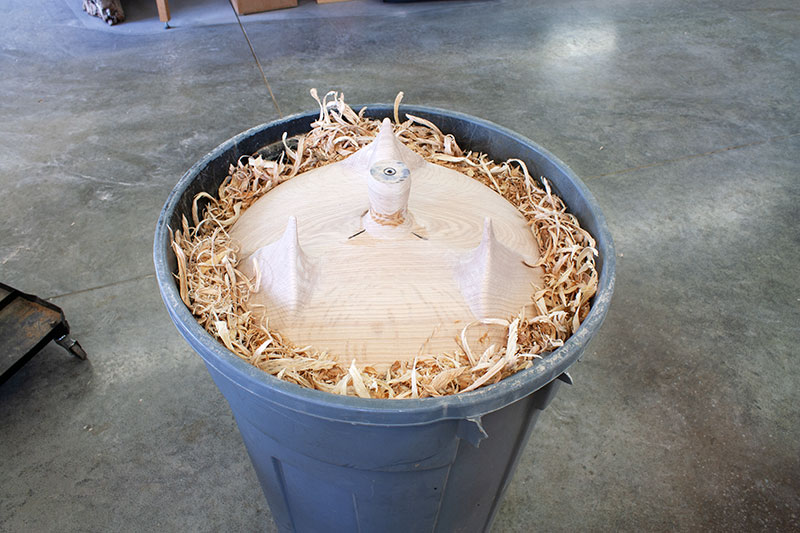
Remove the bowl from the lathe and set it aside. Before removing the bung on the bottom of the bowl and sanding the bottom, fill a large garbage can with shavings about 10 inches down from the top of the garbage can. Place the bowl upside down inside the garbage can and pack shavings around the bowl as pictured below. This is the safest way to hold the bowl, it will not move and the bowl is protected as you remove the bung, carve the bottom and finish the sanding process.
After removing the bung and sanding the bottom of the bowl, be sure to brush on a coat of lacquer/thinner mixed 50%-50%. The lacquer does two things. One, it slows the drying process so the piece will not crack and, two it seals the cells so no contamination or staining will occur when handling the piece while it is hand-sanded and getting the bowl ready for a finish after it has dried.
Allow the piece to dry slowly in ambient air temperature, away from direct sunlight and away from a fan. I allow the bowl to dry for two weeks then hand sand the entire piece using 220 grit, and apply a finish. Pictured below is the dried piece prior to sanding and finishing.