Introduction
The lathe turned wood hat is first mentioned in literature as having been turned by William Murdock in 1777 (see “The Lunar Men”) and is a wonderful project because of the numerous possibilities (styles, shapes and sizes) that can be turned. Hat turning will increase your comfort level regarding thin-wall turning and assist you in learning about bending green wood as it dries.
Design
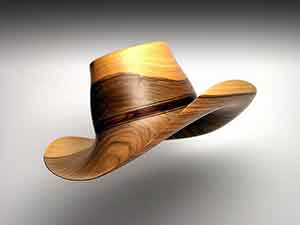
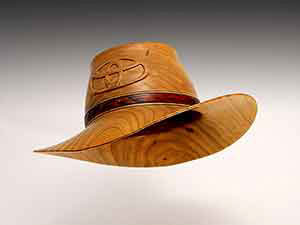
The two types of hats covered in this literature are the Cowboy Hat and the Outback Hat which rank highest in popularity and are the easiest to turn.
 |
 |
Cowboy |
Outback |
Wood
It is important to use a light colored wood when you are learning to turn hats. I recommend starting out with fresh cut or “green” maple. The water content in maple is plentiful and the light color will aid in using a light bulb to gauge the wall thickness as the hat becomes thinner with a final goal of 3/32”. When learning, I suggest that you avoid walnut since the dark color does not allow much light to shine through.
To burnish on the hat band you will need a piece of ebony (or black wood) and a piece of padauk (or rosewood.) I use ebony and padauk for all of my hatbands. The wood will need to be cut to ⅛” thick. I use a piece of ¾” stock by 8” and cut 1/8” thick and sharpened to a point.
Tools
½” bowl gouge
⅜” bowl gouge
1/4” mini gouge
8” calipers
18” calipers
Moffet light or a Gary Sanders light system or both.
3 inch sandpaper disks with 120, 180 and 220 grits
Power sander
120, 180 and 220 grit sheet sandpaper
Measuring Your Head
Step 1 - Determine the hat size
Secure a flexible curve ruler.
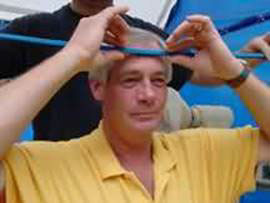
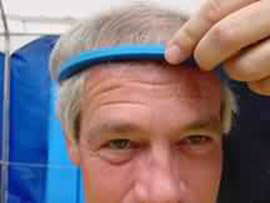
Place the ruler around the head at the exact place where the hat will be positioned when worn. Hold the ruler with 2 fingers at the forehead and wrap the ruler around the head approximately ⅛” to ¼” above the ears.
Push the ruler against the head so that there are no spaces between the ruler and the head. (The ruler will overlap at the ends.)
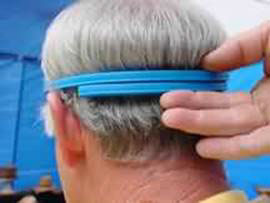
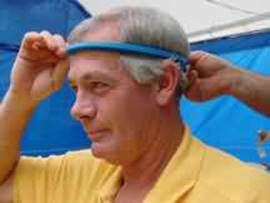
While ‘wearing’ the ruler, pinch the overlapping ends of the ruler at the back of the head together so that the size does not change while removing it from your head. Make certain not to change the size or the shape of the conformed ruler when removing it from your head as this will dramatically affect the size and shape of the final product. The ruler needs to be snug and comfortable but not too tight.
Place the ruler on a piece of paper making certain not to change the size or shape of the conformed ruler and trace the INSIDE of the ruler's size/shape on a piece of paper so you will have the size and shape of the head.
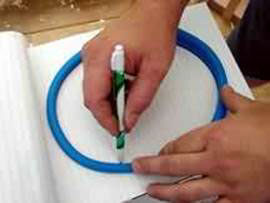
Repeat the steps 2-5 two more times (using the same pieces of paper, overlapping the tracings) to verify that the measurement remains the same each time.
Sizing the Hat
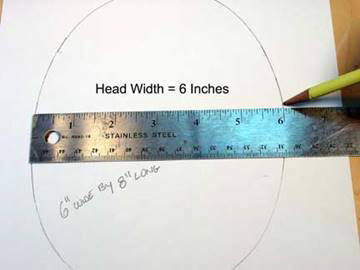
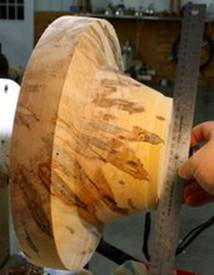
After wrapping the ruler around the head and tracing the shape of the head on a piece of paper, the following instructions are a sure way to calculate the OD (outside diameter) needed for hat sizing.
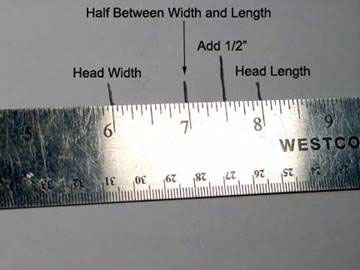
Using a ruler, measure the widest point of the head from side to side and record the measurement. In our model's case the measurement was 6”.
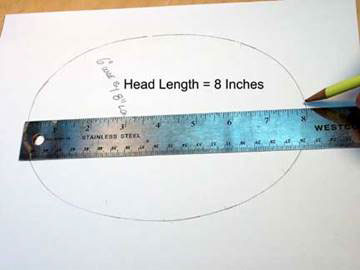
Measure the greatest length from the front to the back of the head and record the measurement. In our model's case the measurement was 8”.
Determine the distance halfway between the width (6”) and the length (8”) In our model's case this was 7”.
Add ½” for OD measurement. In out model's case the OD to turn was 7½”. The formula for arriving at the ½” is as follows: ¼” (for wall thickness of ⅛” plus ⅛”) and ¼” for total shrinkage of the wet blank as it dries.
The following pictures illustrate how to get the OD round measurement of a person’s head.
Head Width
Head Length
Determining the Outside Diameter
We will assume the hat size is 7½”.
Step 2 - Prepare the blank
Select a fresh piece of timber. The tree will need to be a minimum of 18” in diameter for a cowboy hat.
Use a chainsaw and cut an 18” long piece of fresh cut timber.
Look at the center of the log and notice the direction of the split. Stay a minimum of 1½” to the outside of the center or pith of the tree and, using a straight edge, draw a line from bark edge to bark edge following the direction of the split. (Do the same thing on the other side of the split and you will have two hat blanks.) If you cut to close to the pith the hat can crack during the bending and drying process.
Mark the center of the tree’s growth rings on both ends so the growth rings can be easily lined up when the log is cut in half. See Fig. #1. This will make the hat appear very well balanced.
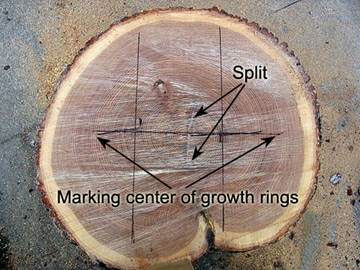
Figure 1
Cut the 18” section of the log in half following the mark you made from bark edge to bark edge. See Fig. #2.
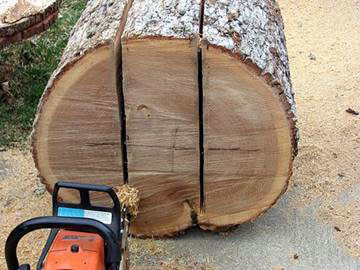
Figure 2
Transfer the mark from the pith of the tree on the end grain ends to the side grain ends. Draw a line connecting the two marks. See Fig. #3.
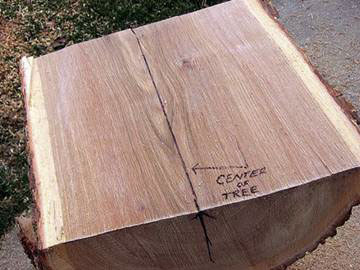
Figure 3
Using a compass put the point of the compass in the center of the line and draw a circle with the diameter of 17” (which will be the brim) and another circle with a diameter of 6”. See Fig. #4. (The 6” diameter will be used to line up the blank on a 6” faceplate.)
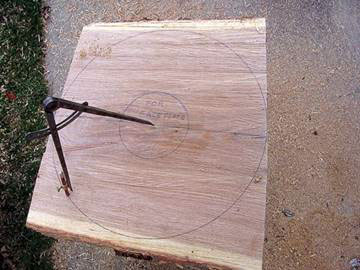
Figure 4
Stand the piece up and cut a flat spot the length of the blank parallel with the brim. The blank must be a minimum of 7 ½” thick (preferably 8” thick) for these style hats.
See Fig. #5

Figure 5
Place the blank on the flat spot and cut the corners and excess material outside the brim circle. See Fig. #6.
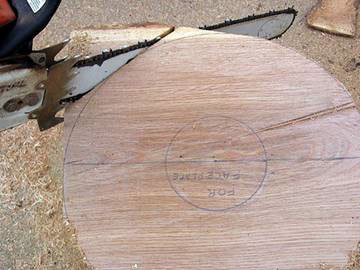
Figure 6
Place blank with brim down and cut into a cone shape. This will greatly reduce turning time and make it much easier to turn. Be sure to leave about a 10” uncut circle on the top of the blank. See Fig. #7.

Figure 7
Step 3 - Rough in the blank
Using a 6” faceplate, mount the blank on the lathe with the brim side facing the headstock. Line up the 6” circle to the 6” faceplate to center the blank. See figure 8.
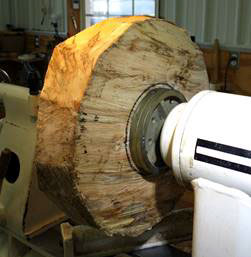
Figure 8
The blank is held in place with a great deal of pressure. If you are uncomfortable using pressure to hold the blank you can use screws in the faceplate. (If you use screws you will have screw holes in the brim of the mini hat that will be cored from the inside of the hat.)
Next you will turn the top of the blank flat to accept the 6” faceplate. See figure 9.
Leave the top surface about 6” wide to make the alignment of the faceplate easier.
Remove the blank from the lathe, remove the nub and secure the faceplate with screws. Use a center point finder to mark the inside center of the faceplate. See figure 10.
 |
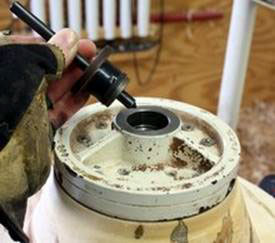 |
Figure 9 |
Figure 10 |
Mount the faceplate/blank back on the lathe. The blank may be just a little bit out of round so it now needs to be “trued up.”
Step 4 - Determine the size of the brim
The cowboy hat has a 4” brim. To determine the brims diameter we will add 8” (This is for a 4” brim on both sides) to the previously determined 7 ½” for the head size. Our brim diameter will be 15 ½”. The brim size can be changed to your own preferences.
For An outback hat has a three inch brim so we will add 6” to the previously established OD head measurement. (This is for a three-inch brim on both sides) Our outback hat will have a brim diameter of 13 ½”. The brim size can be changed to your own preferences.
Transfer the brim measurement to the brim on the blank and turn away the excess material.
Turn the bottom of the brim flat and make a mortise (recessed area) in the center of the blank to accept the Stronghold chuck when the hat is reversed. See figure 11.
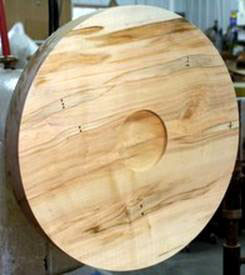
Figure 11
A cowboy hat has a ¼” bevel on the outer edge of the brim. For a cowboy hat, turn the ¼” bevel. The bevel should start about ¾” in from the edge and gently roll up ¼” to the outside edge.
The outback hat should be left flat at the edge of the brim.
The thickness of the cowboy hat brim to the bottom of the cap part of the hat should be left at 1½” thick at this time. This measurement is the fall from the bottom of the cap to the bottom of the brim.
The thickness of the outback hat’s brim to the bottom of the cap section of the hat should be left at 1¼” thick at this time. This measurement is the fall from the bottom of the cap to the bottom of the brim. The cap section is 4”. See figure 12.
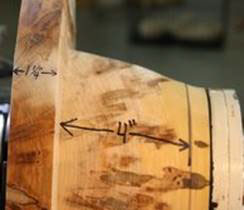
Figure 12
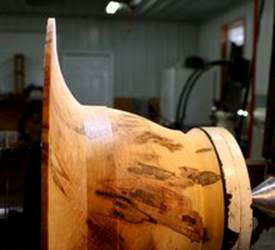
Step 5 - Turning the outside shape of the hat
The outside shape of the hat is turned first. Remove the blank from the headstock and mount the Stronghold chuck on the headstock. Install the small cone on the tailstock. Mount the mortise on the jaws of the chuck and bring up the tailstock. The small cone will zero into the faceplate’s threaded hole. This will perfectly align the blank to run true. Rotate the blank to check for any wobble then tighten jaws of chuck, tighten tailstock.
Set your large calipers on 7 1/2”.
For a cowboy hat the total height from the bottom of the brim to the top of the hat is 6”.
Using your calipers, remove the material on the bottom of the cap where the cap meets the brim until it is 7 1/2” OD at the bottom of the cap. This measurement should continue up 1” up the cap from the brim.
For the hat band measure from the bottom of the cap up ¾” toward the top of the hat and make a mark with a pencil. Remove the material above the ¾” mark to until the OD is 1/16” less giving an appearance of a hat band. See figure 13 and 14.
 |
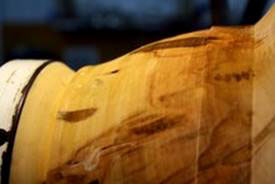 |
Figure 13 |
Figure 14 |
The diameter of the top of the hat can be from 5” to 6” in diameter on average. This measurement may be adjusted for people with smaller diameter hat sizes.
The top corner of the hat should be rounded inward leaving no sharp corners.
Taper the top of the hat to the bottom of the cap section of the hat to just above the hatband. This taper can be straight or a gentle curve depending on your preference.
Step 6 - Shaping the top side of the brim
For an outback hat, turn the first 1” straight inward then make a gentle curve up to the bottom of the hatband. See figure 13.
For a cowboy hat, the brim was left 1½” thick. Start on the edge of the brim and remove material to match the bottom profile bevel to a thickness of ⅛”. Once the bevel has been matched on the top of the brim surface, work your way inward to the area where the cap meets the brim. The shape needed is a gentle, flowing curve. This is important. If it is left straight it will not bend correctly. Creating a shape of a gentle curve gives that hat an area in which it will bend without cracking.
Step 7 - Hollowing the hat
Remove blank form chuck, remove chuck, remove cone on tailstock. Mount blank back on lathe with attached faceplate.
Now the hat can be hollowed using light as a gauge and calipers to verify thickness.
For a cowboy hat, the hollowing will start inside the beveled edge on the brim. Hollow in 1” increments until you are comfortable with the process. Hollow from the outside toward the inside only matching the outside shape until a thickness of ⅛” is achieved.
Once the brim thickness is satisfactory, the mini hat can be cored from the middle of the cap part of the hat. I use the McNaughton straight knife to core the mini hat blank. Plunge inward at a 55 degree angle about ¼” to the inside of the cap part of the hat. Continue the plunge until the top of the mini blank is small enough to break free and be removed from the hat. Set mini hat blank aside. See figure 15 and 16.
 |
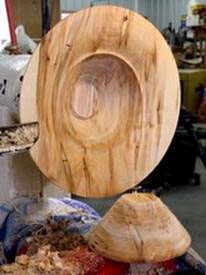 |
Figure 15 |
Figure 16 |
Begin hollowing the cap section of the hat. For the outback hat the outside shape should match the inside and be hollowed to ⅛” wall thickness.
The light will show where the cap section of the hat begins. Stay a minimum of 1/8” to the inside of the darker area (the cap that has not been hollowed.) Continue hollowing in 1” increments to the top as you follow the outside shape of the hat to ⅛” thick. See figure 17.
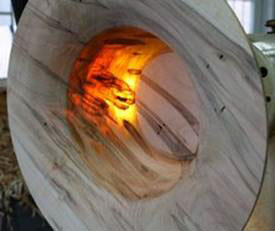
Figure 17
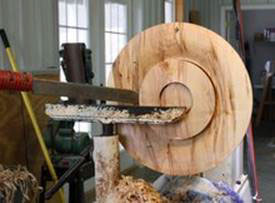
Step 8 - Turning the inside top detail of the hat
The shape of the top of the hat can vary from several different shapes. I fashion the tops of my hats after the Stetson “Gambler” style hat. The outside top of the hat has a ¼” to ½” wide ring then gently rolls down ¾” to another gentle curve then a subtle rise to the middle top of the hat.
To create this “groove” in the inside top of the hat the 1/4” bowl gouge must be held with the flute facing 3:00. The cut is made from the outer wall of the hat to the bottom of the groove then finish the cut as it rises toward the top middle of the hat.
The center of the detail should be even or slightly lower than the outer ring on the top of the hat. See figure 18.
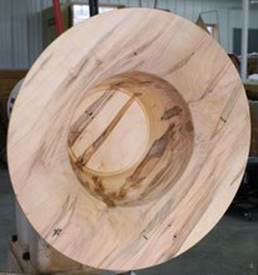
Figure 18
Step 9 - Sanding the inside of the hat
Blow the excess “free water” out of the hat with air. I use 150 PSI to expedite the process. (The “free” and “born” water will be discussed in step 14.)
I always sand with the lathe running in reverse. Sand the hat beginning with 120, 180 then 220 grits. The top detail’s inside corner is the only part that has to be sanded by hand. After sanding is complete, a coat of 50/50% automotive lacquer and thinner is brushed on and let dry for 3 to 4 minutes. The lacquer slows the drying and helps in the bending process by sealing the hat so dirty fingerprints will not corrode the surface. See figure 19 and 20.
 |
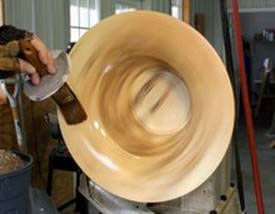 |
Figure 19 |
Figure 20 |
Step 10 - Turning the outside top of hat detail and sanding the outside of the hat
Remove the hat from the lathe; remove the faceplate from the hat.
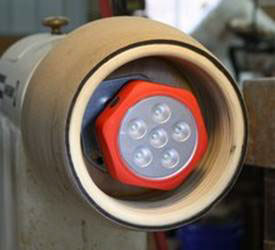
Mount the lighted jam chuck on the head stock. Turn on LED puck lights.
See figure 21 and figure 22.
 |
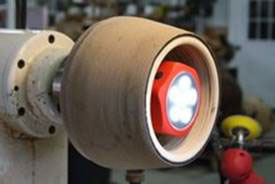 |
Figure 21 |
Figure 22 |
Place the hat over the jam chuck and align using the previously marked center point. Bring tailstock to center and use little pressure to support the hat. See figure 23.
 |
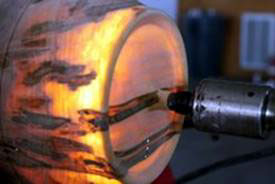 |
Figure 23 |
Figure 24 |
Remove excess material leaving the top center of the hat with a nub in the center of the top of the hat for the tailstock support. See figure 24.
Sand the outside of the hat (with the exception of the top of the hat) with 120, 180 and 220 grits.
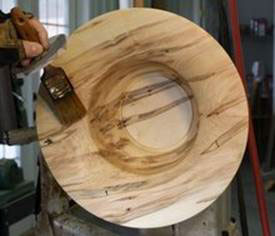
Step 11 - Burnishing the hatband
Place the tool rest up close to the hatband. Sand the Padauk and ebony to a fine point. Apply padauk (end grain only) to the band.
Apply ebony (end grain only) to the band to give the padauk a “highlighted” look. This gives the appearance of an attached hatband. See figure 25 and figure 26.
 |
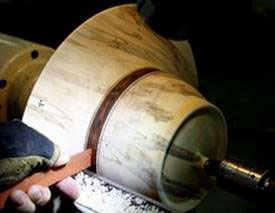 |
Figure 25 |
Figure 26 |
Step 12 - Sanding the top of the hat
Turn off the nub in the middle of the top of the hat. The hat will stay on the jam chuck. Take light cuts so that the hat is not knocked off of center. Remove tailstock and sand the top of the hat with 120, 180 and 220 grits. Apply a brush on coat of lacquer mixed 50%-50% with thinner, let dry. See figure 27.
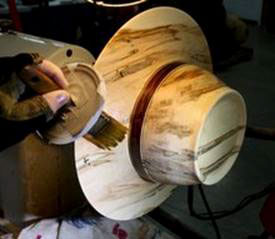
Figure 27
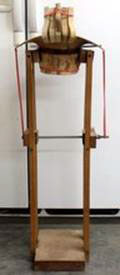
Step 13 - Placing the hat in a bender
Place the hat upside down in a bender. The grain must run parallel with the direction of the bend. The front of the hat and the back of the hat must be end grain sides or the hat will not bend properly and will crack. See figure 28.
The brim should not be touching the cupped blocks that hold the hat but should be in the middle of the hat band. Leaving the brim touching the cupped block will, 9 times out of 10, crack the hat during the drying process. See figure 29.
 |
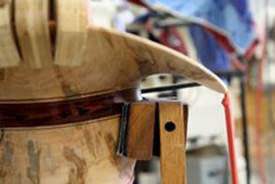 |
Figure 28 |
Figure 29 |
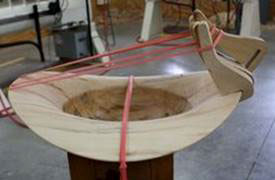
Place brim bender wrenches on the front brim of the outback hat. Apply two rubber bands (one around the middle three and one around all six wrenches) the from brim wrenches around the hat securing the rubber bands to the front of the hat. This will keep the hat from being pulled out of the bender as it bends and dries. Place rubber band across sides of hat to bend sides upward. See figures 30 and 31.
 |
 |
Figure 30 |
Figure 31 |
Apply a small amount of pressure by tightening the benders wing nut.
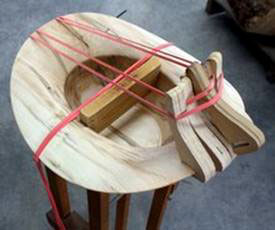
For a cowboy hat put two sets of three 8 ½” by ¼” red rubber bands strung together across the brim on the cowboy hat from side to side to aid in the extreme bending of the western style. Put three small 2 ½” rubber bands across the front of the cowboy hat brim to help make the front of the hat brim smaller.
If one side bends more than the other side you may adjust the tension by moving the rubber bands to the left or to the right.
Step 14 - This is extremely important:
DO NOTHING TO THE HAT FOR A MINIMUM OF 10 HOURS.
Most people think, “It’s not bending and it’s been 2 hours. I had better tighten it up. It’s been 4 hours and it’s not bending. I better tighten it up again. It’s been 6 hours and still no bend. I’ll really tighten it up again. Better tighten it up some more……..it’s been 8 hours……” CRACK!!!!!!!! Don’t think like most people. Let the hat rest in the bender with just a fair amount of pressure for the first 10 to 12 hours. After a minimum of 10 hours then the bender can be tightened quite a bit more.
Place a heat lamp with a 100 watt bulb about 8” over the top of the hat in the bender and another heat lamp under the front of the hat in the bender. See figure 32.
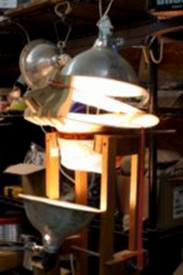
Figure 32
The hat will begin to bend to shape and will continue to shrink for the next 15 to 20 hours. Monitor the bending. It is important to monitor the hat after you have applied the heat lamps. You can use either a hat width block (pictured in figure 33) or you can make a template of the head measurement for a perfect custom fit. If you use a width block measure the width and apply a hat width block when the desired width is achieved. Remember, our head measurement was 6” wide. Don’t let your hat’s side-to-side measurement get to be less than the head width of the person that the hat is intended to fit. See figure 33 and figure 34.
 |
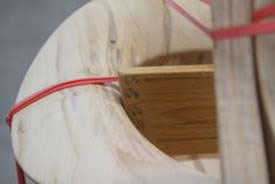 |
Figure 33 |
Figure 34 |
The front to back measurement will fall into place on its own if using the width block. The heat lamps should remain on the hat for a minimum of 12 hours. The heat “sets” the bend in the wood and causes the “born water” to evaporate. The “free water” is what you saw coming out of the blank as it was turned and the excess of the “free water” was blown out of the hat with an air hose. “Born water” is the microscopic drop of water in each wood cell that can not be spun or blown out of a piece of wood. It must evaporate. The bend occurs when the “born water” is evaporating. With controlled pressure and heat from the lamps helping to expedite the evaporation the bend can be controlled.
For a custom fit hat a template of the head measurement must be made. I use 3/4'” x 10” stock for the template. For the template, carefully cut out the drawing of the head measurement and place the cut out of the drawing on your ¾” stock and trace around the drawing. Mark “UP” on the wood template. Cut the traced drawing out using a band saw or a jigsaw. Use a forstner drill bit to drill two holes in the template for evaporation and to make removal of the template possible after the hat shrinks to a custom fit. Install the template upside down (with the “UP” facing down) inside the hat as soon as the hat has shrunk enough to accept the template. The wood template must be installed upside down because the hat is upside down in the bender just as the head measurement was made. Some heads are not symmetrical so the template must be installed in the hat as the persons head was measured upright. See Figure 35.
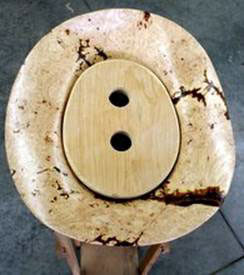
Figure 35
Step 15 - Final hand sanding and finishing
After the hat has been in the bender for a minimum of two days it can be removed from the bender and sanded with 220 grit. Sand the inside and the outside with 220 but DO NOT SAND THE HATBAND. The color from the burnishing can easily be sanded off. The band will have a texture created by the burnishing process that makes the band look like a different material.
Apply a finish directly after the hat has been removed from the bender and has been sanded. If moisture is introduced from humidity, it can cause the hat to slightly lose some of the bend over a period of time. This is why it is important to get a finish on it after sanding.
When properly turned, bent, sanded and finished your hat is a wearable piece of art that will certainly turn heads in any crowd.
|
|
Cowboy |
Outback |
Materials
The Rubber bands can be purchased from:
Manufacturer: Alliance Advantage Rubber Bands SIZE: 8½ x ¼ RED Part #97725
The small and large calipers can be purchased from:
KBC Tools & Machinery
1-800-521-1740 Phone, 1-800-322-4292 Fax
Manufacturer: Starrett
8” small outside calipers: Starrett part #79B-8 Part #1-855-50369 $24.05
18” large outside calipers: Starrett part #1-812-318 Pricing has increased to $22.00
The Curvex Ruler used to measure the head can be purchased from:
https://www.amazon.com/Westcott-Flexible-Curve-30-Inch/dp/B004IXML16
I use is a catalyzed lacquer and a catalyzed sanding sealer to finish the hats. I mix the sealer 50% and thinner 50% and spray on three to four coats allowing each coat to dry. I spray on a final coat of catalyzed lacquer mixed 70% lacquer and 30% lacquer thinner.