CHRIS RAMSEY WOODTURNER/CARVER
Welcome | About | Plans and Instructions | Tips and Tricks | Turned and Carved Art
Hats | People | Articles and Videos | The History of the Wood Hat | Links | Contact
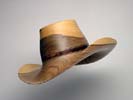
- Turning a Mini Hat -
The mini hat can be a byproduct of the full-size hat. The wood used for a mini hat comes from either a cored piece from inside the cap section of the full-size hat or a tree with a minimum diameter of 10 inches. A mini hat is turned from fresh cut or “green” wood only.
The mini hats sell incredibly well and are a wonderful item to add to your product line. They make wonderful conversation pieces for turners and collectors alike.
Nearly all of the steps used to turn a full-size hat are incorporated in the turning of a mini hat. The turning is basically the same but on a smaller scale.
Design
There are several styles of mini hats including the cowboy, outback, derby, top hat, 10-gallon cowboy hat, sunhat, fishing hat and ball cap. There are variations to all of the styles. This literature will feature the mini cowboy and outback styles.

Wood
When using a branch or small tree, select a section that is a minimum of 10 inches in diameter and cut a section of the branch 8 inches long. Cut the section in half in the same direction of the small split in the center of the branch. This will give you two mini hat blanks. Each blank will need to be a minimum of 4 inches tall. You will need to stay away from the pith or center of the tree by about 1 1/2 inches to keep the hat from splitting when placed in the bender and under side-to-side pressure to make the hat bend. See figure 1.
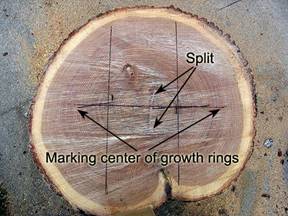
Figure 1
Score a line from the center of the growth rings (pith to pith) on the end grain and transfer the line to the side grain flat surface.
Put the point of a compass in the middle of the line and draw a circle 8 inches in diameter. See figure 2 and 3.
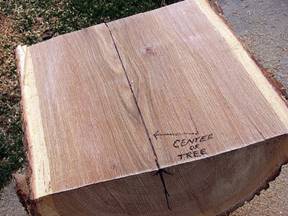
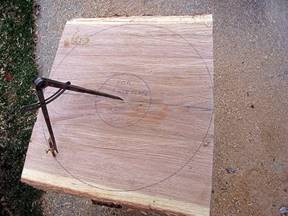
Figure 2 Figure 3
The corners of the blank can be removed on the lathe or with a chainsaw and the blank can be cone shaped prior to mounting on the lathe if preferred. See figure 4.
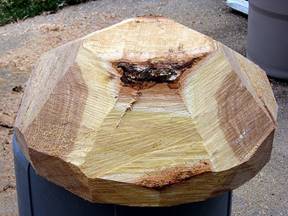
Figure 4
Tools
½” bowl gouge
⅜” bowl gouge
¼” mini gouge
8” calipers
Moffet light or a Gary Sanders light system or both.
Step 1 Rough in the blank
Mount a faceplate on the lathe. Put the flat side of the blank against the faceplate and center the blank using the circle previously drawn as a reference to center the blank. Bring up the tailstock and secure blank in place with pressure between centers.
See figure 5.

Figure 5
Round the blank and cut a small tennon on the top of the blank so it can be gripped by a chuck. See figure 6.

Figure 6
Remove the faceplate, mount the chuck on the headstock and mount the blank in the chuck using the tenon you have created.

Figure 7
Turn the bottom of the blank flat and cut a 2 ½” mortise in the center so it can be held in the chuck. See figure 7.

Figure 8
Remove the blank, turn it around and re-mount it with the bottom of the blank held by the chuck in the mortise you have created. (If you are using a previously cored blank from a full size hat you will start here.) See figure 8.
Step 2 Turn the outside shape
The outside shape of the hat will be turned first.
True up the blank on the bottom and side.
The diameter for a mini hat brim is 7” to 7 1/4" inches. Turn the blank to a diameter of 7 or 7 ¼ inches.
Set your outside calipers to 3⅛ inch.
Measure from the bottom of the blank toward the top of the hat ½ to ¾ of an inch and mark with a pencil. This will be the brim and the fall of the brim from the bottom of the cap and hat band to the bottom of the brim.
Remove all material on the cap section of the hat leaving it 3⅛ inch diameter.
Measure from the top of the brim where the brim meets the cap section of the hat up toward the top of the hat 2 inches and make a pencil mark. This will be the height of the cap section of the hat. Be sure to leave ½ to ¾ inch material above the top of the hat so it can be held in a chuck when hollowed.
The hatband will be ⅜ inch tall. Move up ⅜ inch from the top of the brim and make a mark. The hatband will be 1/16 inch thicker than the hat. See figure 9 and 10.


Figure 9 Figure 10
Turn the outside profile shape of the hat stopping at the top of the hatband. This can be straight or have a gentle ogee shape from the top of the hat to the hat band. The top of the hat will have a small curve inward leaving no sharp corners and leaving a tenon above the top of the hat.
Now turn the profile shape of the brim of the hat. For the brim, remove material from the outer edge of the brim to 1 inch inward and flat then from there incorporate a gentle curve upward to the bottom of the hat band. After the outside shape has been established true up the tenon and bring the tailstock up to create a live center mark for alignment after hollowing. See figure 11 and 12.


Figure 11 Figure 12
Step 3 Hollowing the hat
Now the hat can be hollowed using light as a gauge and calipers to verify thickness.
Remove the hat from the chuck, turn the hat around and place the tennon end in the chuck so it is held by the top of the hat. See figure 13.

Figure 13
Hollow from the outside of the brim toward the hatband matching the outside shape until a thickness of ⅛ inch is achieved.
Hollow the brim first and once the brim thickness is satisfactory, begin hollowing the cap section of the hat. Stay a minimum of 1/8 of an inch to the inside of the darker area as the cap is hollowed so that you don’t accidentally blow through the side of the hat. Continue hollowing to the top as you follow the outside shape of the hat to ⅛ inch thick consistent wall thickness.
The shape of the top of the hat can vary greatly. The top can be flat, dished inward, bulging outward or have a detail like the Stetson “Gambler” style hat.
After turning the detail in the inside top of the hat, the excess “free” water can be blown out with an air hose to expedite the drying so it can be sanded.
Sand the hat (while wet) with 120, 180 and 220 grits sandpaper. The inside of the cap will have to be sanded by hand then the brim can be power-sanded.
After sanding with 220 grit brush on a coat of lacquer and let the lacquer dry for two to three minutes.
Step 4 Turn the top of hat detail and sand the hat
Mount the lighted jam chuck in the chuck and make sure it is turning true.
Turn on LED lights and place the hat over the jam chuck and align using the existing live center mark. When properly aligned bring up tailstock for support. See figure 14.

Figure 14
Remove excess material turning the top of the hat to 1/8 inch thickness leaving a nub in the center of the hat for support from the tailstock. The center of the hat becomes flexible and light will begin to shine through as material is removed. See figure 15.

Figure 15
Sand the outside of the hat (with the exception of the top of the hat) with 120, 180 and 220 grits.
Step 5 Burnishing the hatband
Place the tool rest up close to the hatband and apply padauk (end grain only) to the band as shown.
Apply ebony (end grain only) to the band to give the padauk a “trimmed” look. This gives the appearance of an attached hatband. See figure 16.

Figure 16
Step 6 Sand the top of the hat
Turn off the nub in the middle of the top of the hat, remove tailstock and sand the top of the hat with 120, 180 and 220 grits. Apply a brush on coat of lacquer, let lacquer dry.
Step 7 Bending the mini hat
Place the hat in a mini bender. Unlike the full-size hats, the mini hats can withstand quite a bit of pressure in the bender. See figure 17.

Figure 17 cowboy hat
The grain must run parallel with the direction of the bend. The front of the hat and the back of the hat must be end grain sides or the hat will not bend properly and will crack.
Apply a fair amount of pressure by tightening the bender. Put 1 rubber band across the brim on the cowboy hat to aid in the extreme bending of the western style. See figure 18.

Figure 18
For the outback hat, place it in the bender and apply a fair amount of pressure. Put brim benders on the front of the brim and apply one rubber band to pull the front of the hat down. Put one rubber band across the brim to bend the sides upward a bit. See figure 19 and 20.


Figure 19 Figure 20
Allow the hat rest in the bender with a fair amount of pressure for the first 10 to 12 hours.
After a minimum of 10 hours then the bender can be tightened substantially.
Place a heat lamp with a 75 watt bulb about 2 inches over the top of the hat in the bender. Within a few hours the hat will be bent to shape but will continue to shrink for the next 15 to 20 hours. See figure 21.

Figure 21
Step 8 Final hand sanding and finishing
After the hat has been in the bender for a minimum of two days it can be removed from the bender and sanded with 220 grit. Sand the inside and the outside with 220 but DO NOT SAND THE HATBAND. The color from the burnishing can easily be sanded off. The band will have a texture to it created by the burnishing process that makes the band look like a different material.
Apply a finish directly after the hat has been removed from the bender and has been hand-sanded with 220 grit only to knock down the raised grain. If moisture is introduced through humidity, it can cause the hat to slightly unbend. This is why it is important to get a finish on it after removing it from the bender and hand-sanding with 220 grit only.
I use a pre-catalyzed sanding sealer and apply a minimum of three coats of sealer (mixed 50% sealer to 50% thinner) then apply one coat of pre-catalyzed lacquer (mixed 70% lacquer to 30% thinner) to finish the mini hats.